Time for some more Macro Fun on #macromondays. Do you have a worksheet with data that needs cleaning? Maybe there are some rows that you don’t need. Perhaps you want to delete all the rows that do not contain a particular string. Today’s blog post will show you how to write a simple VBA macro to delete rows that do not include a specific string. I find this a quick and easy way to search through many Excel rows deciding which to delete. Let’s begin!.
Let’s use an example. Every week you receive a data extract containing hundreds of thousands of data rows—all rows in the data that do not include the string “Invoice” need to be removed. Rather than using filter and delete options, a Macro will do this with a couple of clicks. As an added bonus, we can save this Macro in our Personal Macro Workbook to use repeatedly in any workbook.
What Does The Macro Do? How To Delete Excel Rows.
This Macro will identify and filter all of the rows that DO NOT contain the text string your specify, then delete them. There are two solutions to achieving the same result. The first is using looping. The second is using autofiter. In this scenario I use the autofilter method. See my reasoning below.
How Does It Work? Two Ways.
The most common way to tackle this scenario is to loop through the entire column of data. So, if a cell in the column contains the specified text string, then Excel deletes the whole row. Excel shifts a row upward by default on deletion. Therefore, the most logical way is to start at the bottom and work upwards.
Drawbacks Of Looping.
This looping is quite a slow process. Working well for smaller data sets in the main as it is time-This looping is quite a slow process. Working well for smaller data sets in the main as it is time-consuming and slow to execute, but not so good on larger data sets. A standard method of reducing the time it takes to loop through cells is to set the Application Objects ScreenUpdating to false and Calculation properties set to Manual. However, for larger data sets, this can still cause performance issues for the reasons below.
- The Delete Row command triggers Excel to recalculate if there are many formulas in your worksheet, which is time-consuming.
- Looping through all cells in a column is also time-consuming.
Using the Autofilter Method to Delete Excel Rows.
So let’s assume we have the larger data set and want to carry out this procedure more efficiently. The Autofilter Method requires the data set to be arranged in a specific way. The first row must contain field headers or column names. (Which mine is!).
Step 1. Starting The Macro. New Module. Naming The Macro
So, the first step in writing the Macro is to open Visual Basic.. There are two ways to do this. Hit ALT +F11 or Developer Tab | Visual Basic | Insert Menu | Module. Next, name the macro. In this example I have
Step 2. Be Specific About Using the ActiveSheet
This line of code ensures that Excel includes only the active worksheet in the Macro. Essentially, ensuring no other worksheet is affected by the code actions. Also, at this stage, Excel turns off the Auto Filter. Finally, Excel resets the filter to to the off position.
Step 3. Apply The Filter.
Next, the filter is applied to the data range. the data range is set to Column A, right down to the last row with data. The filter is set to filter any rows that do NOT contain the string “Invoice” in Column A or Column 1.
Step 4. Deleting The Filtered Rows.
Any of the rows that are now visible in the filtered range are deleted. The SpecialCells(12).EntireRow.Delete line of code triggers this deletion. Note that the cells to be deleted are offset by. Ths is to accommodate the field or column headers which are required.
Step 5. Remove The Autofilter.
At this stage the autofilter is removed again to reset the worksheet. Finally it is then time time to test the macro.
Do You Want To Copy The VBA Code?
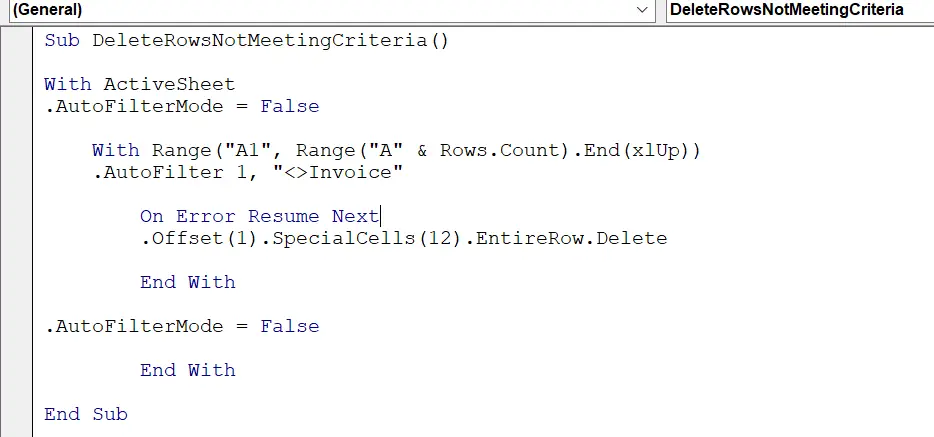
'Step 1
Sub DeleteRowsNotMeetingCriteria()
'Macro by www.howtoexcelatexcel.com

'Step 2
With ActiveSheet

'Step 3
.AutoFilterMode = False

With Range("A1", Range("A" & Rows.Count).End(xlUp))
    .AutoFilter 1, "<>Invoice"

'Step 4
        On Error Resume Next
        .Offset(1).SpecialCells(12).EntireRow.Delete

        End With

.AutoFilterMode = False

        End With

End Sub

Finally, if you want more Excel and VBA tips sign up to my monthly Newsletter. Join me, I share 3 Excel Tips on the first Wednesday of the month and receive my free Ebook, 50 Excel Tips.

Need Help With Your VBA Macros?