So, Hello Excellers, and welcome back to another #formulafriday blog post. Today is a little different as this blog post centers in the Excel status bar. That is correct, We will not be using a formula. For this great Excel tip, we do not even need to type an equals sign. We do not need to enter anything into a cell to calculate the maximum value in our Excel data set. So I guess this is a #notaformulafriday blog post. Figure!.
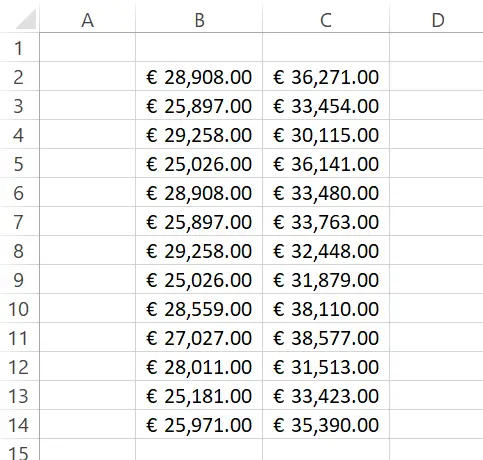
Let’s start with a data set a bit like my example below. We want to find the largest or the maximum value in the data set. So, we could use a few formulas we have in our Excel formula toolbox. But, if we want a quick visual of the maximum value, we do not need to go near any formula.
So, all we need to do is use the Excel Status Bar to give us these quick calculations.
Where Is The Excel Status Bar?
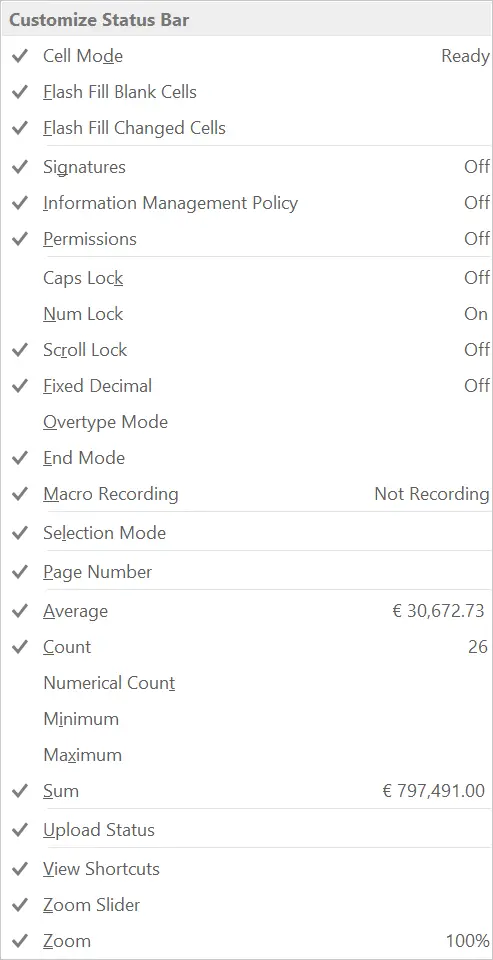
First, let’s take a step back and look at the Excel Status Bar. The bar located at the bottom of the Excel window where it displays valuable and exciting information, including the maximum value in the data set. So, how handy is that?.
| Option | Status Bar Display |
| Cell Mode | Selected by default, this option displays the current cell editing mode on the left side of the status bar.
· Ready to indicate a general state. · Enter to indicate content entry mode. It is displayed when you select a cell and start typing, or when you press F2 twice. · Edit to indicate in-cell editing mode. It is displayed when you double-click a cell, or when you press F2 so that you can enter or edit data in a cell. · Point to indicate formula cell selection mode. It is displayed when you start a formula and then click the cells that you want to include in the formula. |
| Flash Fill Blank Cells | Selected by default, this option indicates the number of cells that were left blank after a Flash Fill operation. |
| Flash Fill Changed Cells | Selected by default, this option indicates the number of cells that were populated by the Flash Fill. |
| Signatures | Selected by default, this option indicates that the active workbook has been digitally signed. |
| Information Management Policy | Selected by default, this option indicates that Information Rights Management (IRM) has been used to restrict permission to content in the active workbook. |
| Permissions | Selected by default, this option displays an icon next to the Cell Mode indicator that you can click to view the current read and edit document permissions.
This icon displays only when access to the document has been restricted. To apply restriction in Excel 2007, click Microsoft Office Button, Prepare, Restrict Permission, Restricted Access. In other versions, click File > Info > Protect Workbook > Restrict Access > Restricted Access. |
| Caps Lock | When selected, this option displays Caps Lock to indicate that CAPS LOCK is turned on to allow typing in uppercase characters. |
| Num Lock | When selected, this option displays Num Lock to indicate that NUM LOCK is turned on to allow using the keys on the numeric keypad to enter numbers in the worksheet. |
| Scroll Lock | Selected by default, this option displays Scroll Lock to indicate that SCROLL LOCK is turned on to allow scrolling in the worksheet by using the arrow keys. |
| Fixed Decimal | Selected by default, this option displays Fixed Decimal to indicate that all numerical values that you enter on the worksheet will be displayed with fixed decimals. This option is turned on when you select the Automatically insert a decimal point check box under Editing options on the Advanced tab of the Excel Options dialog box. (in Excel 2007, click Microsoft Office Button, Excel Options, Advanced. In other Excel versions, click File > Options > Advanced.). |
| Overtype Mode | When selected, this option displays Overtype to indicate that INSERT was pressed to activate overtype mode while editing cell contents in cell editing mode (double-click a cell or press F2). |
| End Mode | Selected by default, this option displays End Mode to indicate that END was pressed to activate end mode. Pressing END followed by an arrow key moves the selection in the direction of the arrow key, stopping at the start and end of data, and then the start or end of the worksheet. |
| Macro Recording | Selected by default, this option displays a button next to the Cell Mode indicator that you can click to start recording a macro. |
| Selection Mode | Selected by default, this option displays one of the following cell selection modes.
· Extend Selection when you press F8 to extend the cell selection by using arrow keys. · Add to Selection when you press SHIFT+F8 to add a nonadjacent cell or range to a selection of cells by using the arrow keys. |
More Options Available In The Excel Status Bar.
| Page Number | Selected by default, this option displays the page number of the selected worksheet page and the number of pages in the worksheet when you are working in Page Layout view or Print Preview view. |
| Average | Selected by default, this option displays the average that is calculated from selected cells that contain numerical values. |
| Count | Selected by default, this option displays the number of selected cells. |
| Numerical Count | When selected, this option displays the number of selected cells that contain numerical values. |
| Minimum | When selected, this option displays the minimum numerical value in selected cells. |
| Maximum | When selected, this option displays the maximum numerical value in selected cells. |
| Sum | Selected by default, this option displays the sum of numerical values in selected cells. |
| Upload Status | Selected by default, this option indicates the upload status of the spreadsheet to the web. |
| View Shortcuts | Selected by default, this option displays the Normal view, Page Layout view, and Page Break Preview buttons. You can click these buttons to change the current view. |
| Zoom | Selected by default, this option displays the Zoom level. You can click Zoom to open the Zoom dialog box. Use this to specify the percentage of magnification that you want to use. |
| Zoom Slider | Selected by default, this option displays the Zoom slider with the Zoom out and Zoom in buttons. Drag the slider or click the Zoom out and Zoom in buttons. This will magnify the content of the worksheet to have a closer look. This allows you to reduce the size of the content on the worksheet so that you can view more content. |
Selecting The Options.
So, to select or deselect any of the options that are available simply right click on the bar. Therefore, just select or deselect your required option. Easy as that.
Use The Status Bar To Display The Maximum Value In Your Excel Data Set.
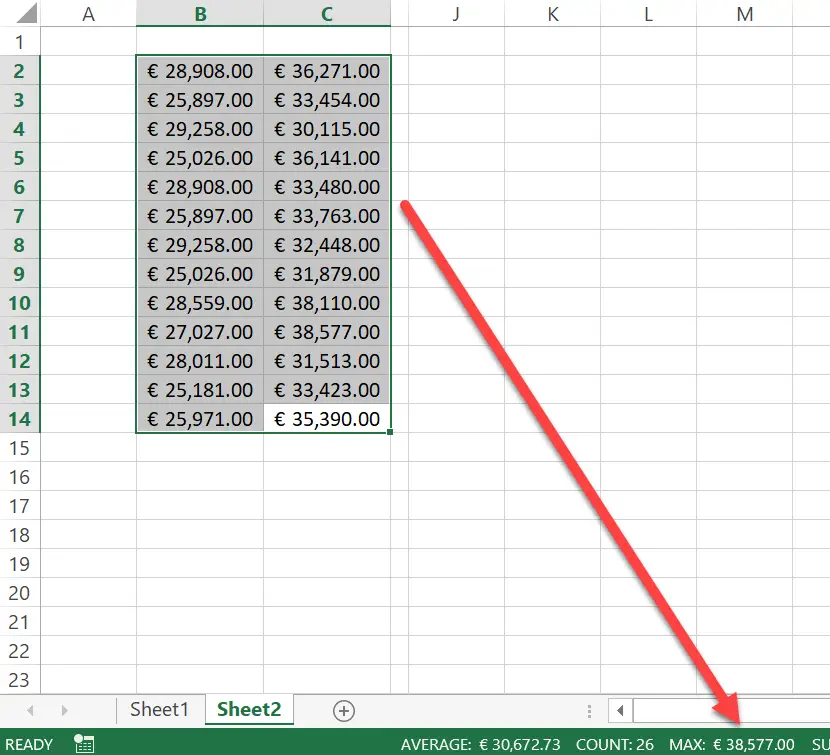
- Select the data set on your Excel worksheet by using ALT+A keyboard shortcut or selecting with the mouse
- Depending on your selection of functions in the Status Bar you will see the maximum value in our data set. In this case, this set is €38,577.00
It is as easy as that. So, we can also see the Average of our data set, as well as a count of the number of records. Handy?.
So why not explore the options that are available on the Excel Status Bar?.
So, What Next? Want More Tips?
Finally, if you want more Excel and VBA tips then sign up for my Monthly Newsletter where I share 3 Tips on the first Wednesday of the month and receive my free Ebook, 30 Excel Tips and check out all of my Formula Friday Blog posts below.
How To Excel At Excel – Formula Friday Blog Posts.
Do You Need Help With An Excel Problem?.
Finally, I am pleased to announce I have teamed up with Excel Rescue, where you can get help with Excel FAST. Why not check it out?.


