Do you ever need to put a timestamp in an Excel spreadsheet? Maybe you are tracking time for billing purposes or maybe you just want to keep track of what happens when. If so, this post is for you! In the following steps, I will show how to create a timestamp with VBA code.
Create A Timestamp Using Excel Formulas.
There are other ways that you could accomplish creating timestamps in Excel. One of the most frequent questions and one of my most popular and visited blog posts is Create A Timestamp In Excel with Formulas.
The formula solution, whilst very useful does not suit everyone and has some restrictions in itself. If you are brave enough to take on a small bit of VBA code, we can create and event handler macro which is a good alternative solution to using the formula method which I find is slightly more robust and flexible.
VBA Macro To Create Excel Timestamp.
This was a an alternative solution for a subscriber rather than the formula date and time stamp method. He wanted the timestamp to update if he decided to overwrite the contents of the target cells again and again. This I believe gives that solution.
There is no need to insert a module in, or use a module in this piece of code, it is written directly to the worksheet you want the timestamp to appear on. That makes sense right?
So, here is a step by guide to inserting a timestamp into Excel with VBA. You can download a sample workbook here to work through this example.
We are assuming that the date time stamp will be entered into Column B when an entry is made into Column A.
- Open up your Excel worksheet and hit ALT +F11 to open the Visual Basic Editor. ( if you need to enable the Developer Tab you can find out more here)
- Double Click on the Excel worksheet where your timestamp is to appear- in this example it is Sheet 1.
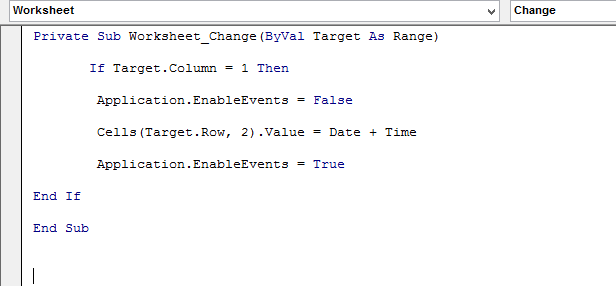
- In the left hand drop down box select Worksheet and in the right select Change. (This will create a macro that runs when the worksheet changes), and the Value Target As Range means any cell we choose to apply this to.

- We want to then type the following code underneath the First Line that Excel generated for us.
If Target.Column = 1 Then
Application.EnableEvents = False
Cells(Target.Row, 2).Value = Date + Time
Application.EnableEvents = True
End If

Walk Through Of Excel Timestamp Code.
Let’s talk through the code. It is an If Then Statement with the following meaning.
If The Target Column 1 changes Then we want the cells in the Target Row in the Second Column to change to the value of Date and Time. Easy huh?. Now we have a couple of extra lines of code in there, the Application.EnableEvents. By adding these in we ensure that the macro does not run on and on, by turning off the macro then turning it on as required.
This solution allow overwriting of previous entries, and will update with the latest date time stamp. So if you find the Formula way of inserting a timestamp into an Excel worksheet then these few little lines of code may just be your solution.
So, the result of this piece of code looks like this.

Let me know if you find this piece of code more useful than the formula solution in the comments below.
We’ve covered the basics of setting up a timestamp in Excel, and we hope that these tips will help you to create your own timestamps. If this post has been helpful to you, please share it with others who may be interested! Feel free to ask any questions below or at our website for more information. Finally, I would love know if this was useful for you so we can make future blog posts even better – thank you!
Other Suggested Excel Tips.
