Hi, it is time to write a macro again with my 2019 series of #MacroMonday. So, today let’s look at how to write an Excel Macro that protects your worksheets but enables Pivot Tables. This is a great solution if you are sharing your Excel workbooks with an audience. So, it allows limited access only to the Pivot Tables. All of your data, formulas, and content will be protected.
Protect Worksheets But Enable Pivot Tables.
You may already be aware that there is a manual way to protect everything on your worksheets apart from the Pivot Tables. So, let’s go ahead and quickly cover the manual process. We can then have some fun and speed things up with a Macro version which take a couple of clicks to run.
The Manual Method.
- First, unlock any cells that you want the user to be able to access. This is easy to do, select the cells, then hit Home Tab | Cells Group | Format Cells. On the Protection tab ensure there is no tick in the Lock Cells tick box.

Next, to implement these changes we need to protect the worksheet. Hit the Review Tab | Protect Group | Protect Sheet. Enter a password if you want to. Ensure that Use Pivot Table & Pivot Chart is checked and uncheck the rest of the options. Hit Ok and confirm the password if you used one.

So, that is the manual way to lock down your Excel worksheets but leave Pivot Tables available to use. Now, let’s get some coding done a speed this process up.
Preparing To Write The Macro.
First, you will need to open the Visual Basic Editor. There are two ways to do this. Either by hitting ALT +F11 or selecting the Developer Tab | Code Group | Visual Basic. Both methods have the same result. You then have a choice, you can either create a module to store your code either in your Personal Macro Workbook or in your current workbook. What’s the difference?. If you save the macro in your Personal Macro workbook it will be available for use in any of my Excel workbooks. If you store it in the current workbook then use is restricted to that workbook.
This macro will be useful to reuse in any workbook with Pivot Tables. Therefore I will create and save this macro for future use in my Personal Macro Workbook.
More About Your Personal Macro Workbook (PMW).
If you want to read more about your Excel PMW then check out my blog posts below.
Macro Mondays -Creating and Updating Your Personal Macro Workbook
Macro Mondays – Create A Shortcut To Your Personal Excel Macro Workbook
Why Is My Personal Macro Workbook Not Loading Automatically?
Preparing To Write The Macro.
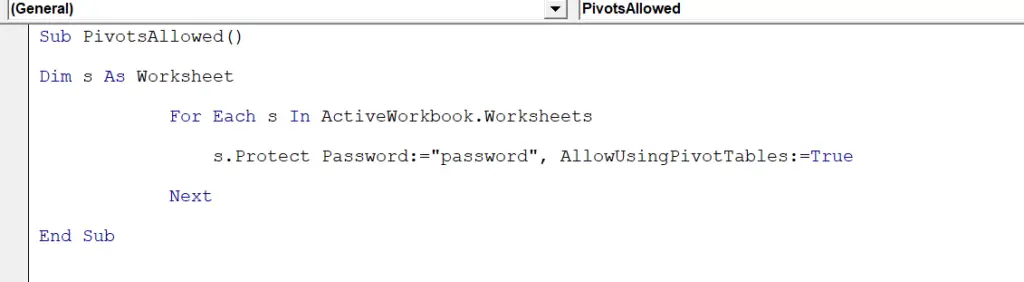
We need to start off the macro by inserting a New Module. Do this by selecting the Personal.xlsb workbook, then Insert Module. Type Sub then the name of your macro. In this example, I have called it simply PivotsAllowed. Notice that Excel will automatically enter the end text End Sub to end the Sub Routine. We simply need to enter the rest of the code between these two lines.
[stextbox id=’info’]
Sub PivotsAllowed()
End Sub
[/stextbox]
Declaring Variables.
Next, we will need to declare either one or more variable. This just ensures that Excel allocated some memory to store that information. We need to just declare one variable in this macro.
[stextbox id=’info’]
Dim s As Worksheet
[/stextbox]
Use The For Each Next Loop.
Excel now begins to loop through all of the worksheets in the workbook Excel does this using the For…Next looping method. On each of the worksheets, all cells are locked to the user. The only option that is set to True is AllowUsingPivotTables.

Excel loops through all worksheets until all have been protected with the specified password.
[stextbox id=’info’]
For Each s In ActiveWorkbook.Worksheets
s.Protect Password:=”password”, AllowUsingPivotTables:=True
Next
[/stextbox]
Ending The Macro.
The routine then ends with the End Sub piece of code. This was already entered into the module for us when started the type the name of the Macro.
[stextbox id=’info’]
End Sub
[/stextbox]
If you want more Excel and VBA tips then sign up to my monthly Newsletter where I share 3 Excel Tips on the first Wednesday of the month and receive my free Ebook, 30 Excel Tips.
Likewise, if you want to see all of the blog posts in the Macro Mondays Series Click The Link Below
How To Excel At Excel – Macro Mondays Blog Posts.


So, Don’t forget to SUBSCRIBE to the How To Excel At Excel Newsletter for more tips the first Wednesday of the month.