Hello, Excellers. Welcome back to another #FormulaFriday #Excel blog post in my Excel 2020 series. Today I will show you two ways in which you use Column and Row labels as named ranges.
About Named Ranges.
A named range is simply a name that refers to either a cell, a range of cells, a constant value or a formula. These names can then be used in a formula to replace a constant value or a cell reference.
If you want to read more about named ranges I have a blog post right here. In summary, my top three reasons for using named ranges are
- Your formulas will make more sense
- You can easily edit your formulas
- Formulas created really quickly
Two Ways To Use Column and Row Labels As Named Ranges.
So, let’s look at the two ways to use the column or row labels as named ranges in Exel.
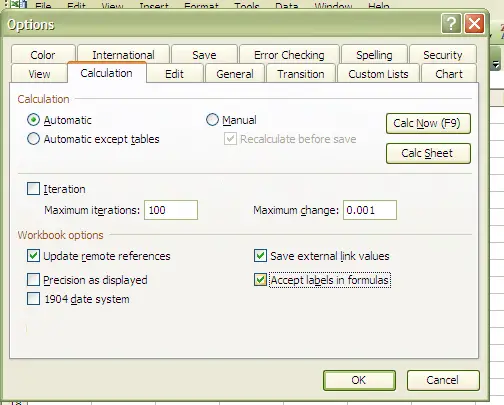
First, if you are starting with a new workbook you can actually get Excel to recognise the column and row labels as names. To do this before you create any formulas in your workbook
- Tools
- Options
- Calculation
- Check accept labels for in formulas box.
Second, if you are working on an existing workbook you have the option to convert existing labels to range names. The labels can be positioned at any edge of the range of values to name.
Open a new workbook. Type in the data as below

Next, select the cells containing the text labels and at least 1 of the adjacent cells that contain your value. In this case it would be cells A1:C2 to incorprate the the labels and row one of our data.
- Insert
- Name
- Create
The create names dialogue box will open and you need to instruct Excel to take the Top Row as the Names Labels. Just click ok.
Excel will ensure that any characters that are not allowed in the labels are converted. For example, spaces will be replaced with an underscore (_) . If there are names already in the workbooks a prompt will appear to replace them.
In the example cells A1:C2 gives us the labels Sales_Rep, City and Widgets_Sales with one row of corresponding data.
The next example will allow Excel to take the left column to be the label.
In your sheet type Widget_ Sales_Tax in cell D1 and 17.5% in E1 and highlight both cells
- Insert
- Name
- Create
The create names dialogue box will open and you need to instruct Excel to take the Right Column as the Names Label. Just click ok. Job Done! Easy named ranges.
So, if you want more Excel and VBA tips then sign up for my Monthly Newsletter. I share 3 Tips on the first Wednesday of the month. You will receive my free Ebook.
