 Welcome to Session 2 in Pivot Table Week.
Let’s do a quick recap here. I have found to fully understand and get the best out of this fantastic Excel function you need to know the core terminology, concepts, functions and bulding blocks to getting your data set just right so you can have perfect pivots!
Previously we discussed that Pivot tables allow you to analyze a data set or this is sometimes referred to as a record set. It is simply a table or list of data which you could have typed into Excel yourself, or equally received as an output form an SQL query or an MS Access Database i.e from an External data source.
The Pivot Table will analyze the data in the data set, and will quickly allow you to summarize, perform calculations (without generating the formulas!!) on huge amounts of data all by dragging, dropping and selecting columns and rows and interactively moving them around to display the data summaries you want to.
Let’s jump in with an example of what a Pivot does with an example.
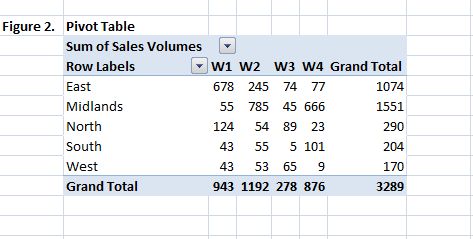
In Figure 1 below is my raw data list whereas in Figure 2 shows how the data is transformed into summarized information that means so much more than a bunch of data rows.

![]()

In my summary data in the Pivot Table I can easily see that East Area Sold 678 volumes of W1 and West Area sold only 9 W4 and Excel has done all the hard work.
Let’s get on and create your first Pivot Table.
Here are the basics of creating a Pivot Table In Excel.
- Select the data set you want to use for your pivot table
- The first thing to do is put your cursor somewhere in your data list (why not use my example data in the Download below?)
- Select the Insert Tab
- Hit Pivot Table icon
- Select Pivot Table option
- Select a table or range option
- Select to put your Pivot Table on a New Worksheet or on the current one, for this tutorial select the first option
- Click Ok
- The Options and Design Tab will appear under the Pivot Table Tool
- Select the check boxes next to the fields you want to use to add them to the Pivot Table
You can download a practice sample file and work through the example right HERE.
{filelink=7}
OR you may prefer to watch a video?.
You can do that right below
Other Useful Links
1. Pivot Table Week Session 1- What Are Pivot Tables?
2. Search For And Highlight Invalid Data In Your Excel Worksheets
3. Learn Excel Formulas Fast And Fun