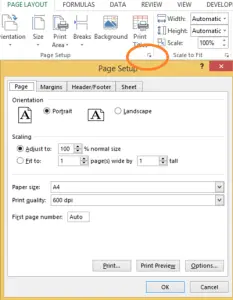
I am sure you aware of headers and footers if you are a user of MS Office. It really is the best way to ensure that either an object or text appear on every page when printing. Here is how to insert your company logo on each page of your Excel work book.
- Page Layout Tab
- Expand the Menu option on the bottom right of the Page Set Up Group
- Click the Header and Footer Tab
- Custom Header
- Choose the section you want your Logo to be in – I have chosen Right for this example
- Click the Insert Picture Icon
- Browse to select the location of the logo you want to use
- Hit Ok and your logo will be inserted
- To change the size or edit the logo further then select the Format Picture Icon
- I find that 1.75 cm height and 4 cm width is a nice fit but do experiment if you want the Logo to be larger or smaller.
- Here you can see my Excel At Excel Logo on the top right of the workbook and will print on every page in my workbook.
How To Compress Picture Sizes In Excel
How To Change The Number Of Recently Used Files Excel Displays
How To Print An Entire Excel Workbook At Once
Control how many last used Files Excel displays for you
Prevent user printing an Excel workbook


