Hello, Excellers. Are you new to Excel Visual Basic?. Just need a refresher?. Well, it is back to basics of the good old macro today. Let’s take a look at what the three different Visual Basic windows are for in the Developer Tab
The Three Visual Basic Windows.
- The Project Window
- The Code Window
- The Properties Window

The Developer Tab needs to be enabled in order for you to see this window. So, if you cannot see the Developer Tab, don’t worry it is really easy to enable it. Feel free to watch my YouTube Video also on enabling the Developer tab below.
Visual Basic Windows In Excel 2010 Onwards.
- Click on the File tab of the ribbon to open the file menu
- Select Options in the menu to open the Excel Options dialogue box.
- Click on the Customize Ribbon option in the left-hand window to view the available options in the right-hand window of the dialogue box.
- Under the Main Tabs section of the options, window tick the Developer option.
- Click OK.
- The Developer tab should now be visible in the ribbon in your Excel window
So you can navigate to the Developer Window either by
- Developer Tab
- Code Group
- Visual Basic Editor
Or using a keyboard shortcut of ALT+F11 (my personal favourite).
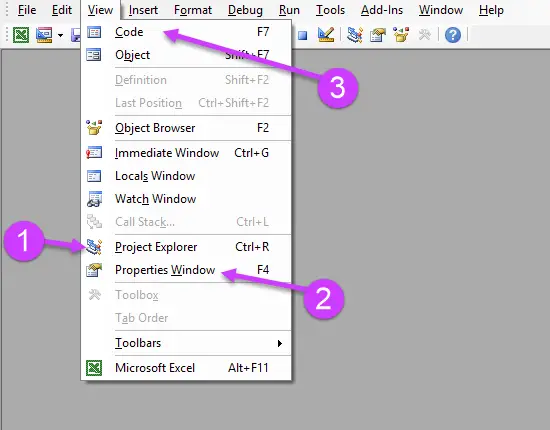
If your window does not look like the one above, (it may be just one grey screen or only have one of the elements showing), again it is really easy to enable all of the different parts of the developer window that we need. All of the screen parts we need are in the View Menu. Just hit View then enable them one by one.

The PROJECT EXPLORER Window.
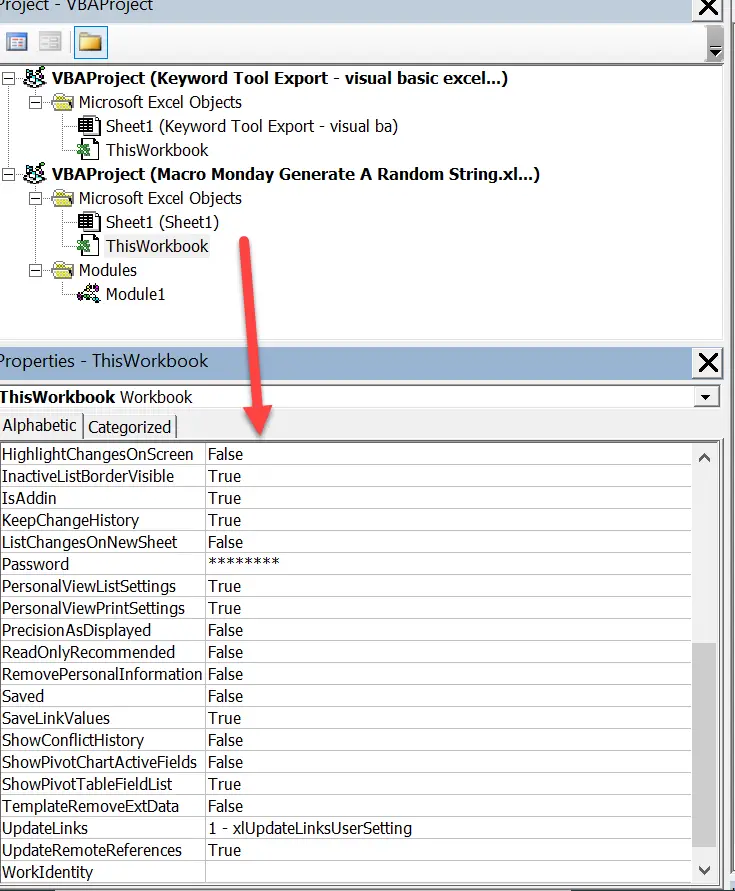
This window displays a Project for each workbook you have open at the time. Now, a project is simply the collection of objects and modules that are linked to your current workbook. It looks like there is a lot going on, but you soon get used to navigating around the screen. By default or initially, your project will contain
- A Workbook Object– linked to your workbook.
- Worksheet Objects linked to each of the worksheets in the workbook.
You can also add into your projects the following USERFORMS, CLASS MODULES and MODULES. Each of these objects have code window associated with them used to store- that’s right code!.
- A USERFORM can be used to interact with your Excel users.
- CLASS modules are used if you create your own objects.
- MODULES are used to store general code.
- Code linked to a worksheet specifically should be in the WORKSHEET object.
- Code linked to workbook specifically should be in the WORKBOOK object.
The PROPERTIES Window.
This window lists all of the properties of the object that is selected in the Project Window at the time of design only. Not only when any visual basic macro code is running.
The types of properties displayed can vary depending on the type of an object selected at the time. i.e it could be a Module, a workbook or a worksheet.
If you click on the different objects in the project window you will see the types of properties changing depending on what you have selected.

The Code Window.
If you double-click on any of the objects in the Project Explorer Window then any associated code with that object will appear in the code window.
So, if you have recorded a macro you can click on your macro name in Modules folder in the Project Explorer and see the code that Excel has generated for that macro.
So that’s it the basic three windows of the Visual Basic Windows to help in your macro understanding.
Macro Monday Blog Posts.
I have teamed up with Excel Rescue. So, do you have an Excel problem?. No problem!. Why not check out Excel rescue?.