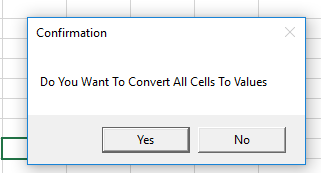
Macros can be a great way to automate tasks in Excel, but sometimes it’s essential to make sure the user is aware of what the macro is about and confirm they are confident they want to run it. You can do this by using a message box. This post will show you how to display a message box in Excel VBA to ensure the user wants to run the macro.
A few weeks ago, I showed you a little Macro that would convert all formulas on a worksheet to values. You can read that blog post at the link below.
Macro Mondays – A Very Useful Excel Macro To Convert All Cells To Values.

I thought it would be useful to show you how to build an extra step into this Macro, to prompt the user to confirm that they do want to run the macro. So, let;s go ahead and thee Excel VBA a Message Box, which pops up onto the screen to collect a confirmation from the user that they want to run the macro.
The Message Box in Excel VBA
This is known as the MsgBox Function in VBA, which as well as getting user inputs can also be used to simply display information to the user. MsgBox in Excel VBA has a syntax as follows
MsgBox(prompt[, buttons] [, title] [, helpfile, context])
The arguments are straightforward. Not all arguments are required to use the message box effectively.
prompt –this is a string that is displayed as a message in the dialog box. The maximum length is 1024 characters, and if your message is longer than 1 line then you can enter a carriage return CHAR(13) or a line feed CHAR(10) between each line.
buttons – this is an optional numeric parameter which specifies the type of buttons to display, the icon style to use, the identity of the default button, and the modality of the message box. If left blank, the default value for buttons is 0 in the message box.
title- this is another optional string value which is displayed in the title bar of the message box. If you leave this blank then the application name is used.
helpfile – this is another optional string expression that identifies the Help file to use for providing context-sensitive help for the dialog box.
context – an optional numeric expression that identifies the Help context number assigned by the Help author to the appropriate Help topic. If context is provided, helpfile must also be provided.
Parameter Buttons.
The buttons parameter can take the any of the following values
- 0 vbOKOnly – Displays OK button only.
- 1 vbOKCancel – Displays OK and Cancel buttons.
- 2 vbAbortRetryIgnore – Displays Abort, Retry, and Ignore buttons.
- 3 vbYesNoCancel – Displays Yes, No, and Cancel buttons.
- 4 vbYesNo – Displays Yes and No buttons.
- 5 vbRetryCancel – Displays Retry and Cancel buttons.
- 16 vbCritical – Displays Critical Message icon.
- 32 vbQuestion – Displays Warning Query icon.
- 48 vbExclamation – Displays Warning Message icon.
- 64 vbInformation – Displays Information Message icon.
- 0 vbDefaultButton1 – First button is default.
- 256 vbDefaultButton2 – Second button is default.
- 512 vbDefaultButton3 – Third button is default.
- 768 vbDefaultButton4 – Fourth button is default.
- 0 vbApplicationModal Application modal – The current application will not work until the user responds to the message box.
- 4096 vbSystemModal System modal – All applications will not work until the user responds to the message box.
The first group (0 to 5) indicates the buttons to be displayed in the message box.
The second group (16, 32, 48, 64) describes the style of the icon to be displayed.
The third group (0, 256, 512, 768) indicates which button must be the default.
The fourth group (0, 4096) determines the modality of the message box.
The Return Values Of The Message Box
- 1 – vbOK – OK clicked
- 2 – vbCancel – Cancel clicked
- 3 – vbAbort – Abort clicked
- 4 – vbRetry – Retry clicked
- 5 – vbIgnore – Ignore clicked
- 6 – vbYes – Yes clicked
- 7 – vbNo – No was clicked
Ok. so now we know th basics let’s get back to our example macro. The purpose of the the Exel VBA message box in this example is to prompt the users to confirm they want to convert all of the cells in the worksheet to values. This is an important question with non reverable consequences. So, asking the small confirmation is sensible. The original coding for the macro is below. If you want to copy the code feel free to do so.
Adding The Excel VBA Message Box
So, the next step is to prompt the user with the addition of the following code for the VBA message box in Excel. Let’s break down the arguments used in this example.
prompt – “Do You Want To Convert All Cells To Values”
buttons – Yes No
title – “Confirmation”

So that is how to use a message box to allow the user to confirm if they want to run the macro or not.
Sub ConvertCellsToValues()
‘macro by www.howtoexcelatexcel.com
If MsgBox(“Do You Want To Convert All Cells To Values”, vbYesNo, “Confirmation”) = vbYes Then
ActiveSheet.Cells.Copy ‘ copy all cells
ActiveSheet.Cells.PasteSpecial Paste:=xlPasteValues ‘paste all values
Else
Exit Sub
End If
End Sub
Copy The Full Code Right Here.
My Recommended Excel VBA Course.
Unlock Excel VBA and Excel Macros
Automate Complex Tasks with Microsoft Excel VBA & Excel Macros (Real-World Projects included). Achieve More. Save time.


