Do you need to create a timestamp in Excel? You have two methods to choose from. In this blog post, we’ll show you how to do it with each method. Read on to learn more! This really is THE most common question I receive my email, or on my website. – How can I create a time stamp on my Excel sheet?. Users get really frustrated that there is not an already created function for this in Excel as it is obviously widely used. There are a few ways to achieve this, one is using an Excel formula, and the second method involves a tiny bit of VBA.
I thought I would consolidate the two best ways into one blog post, and you can choose the best option for yourself either formula route or VBA option.
Create A Time Stamp Using An Excel Formula
We probably all know that we can use the =TODAY() formula or the =NOW() formula to enter a date into Excel, which update automatically. This function is known as “volatile” as the function recalculates when Excel updates.
This is not really any good for a timestamp, as we would want an invoice entry or project update to be static. We therefore can use
CTRL+ ; to enter the current date or
CTRL+SHIFT+: to insert the current time
These both will remain static, but are still very manual having to insert the date and or time with keyboard the above shortcuts. That is all well and good but wouldn’t it be great to just insert your changes to a worksheet and the timestamp appear as you type?. You can but it takes a bit of Excel magic and an understanding of Circular Formulas.
What Is All This About Circular References?
You may have come across them before but if not here’s a quick run down. A circular formula is one that refers back to itself either directly or indirectly. Let’s take a look at an exmaple.
Lets look at a direct example.
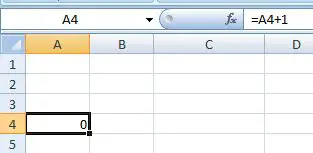
If I type =A4+1 in cell A4 I am directly referring to the cell I am writing the formula in. This results a warning from Excel in case you did not create this circular reference intentionally (as we did) and the result of the formula is zero.
Let’s look at an indirect example
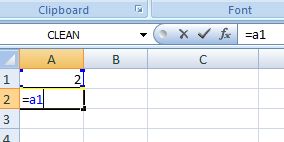
If I type 2 into cell A1,
then type =A1 into cell A2
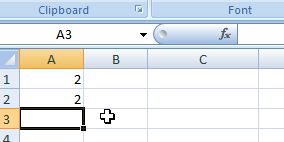
then A2 refers back to A1 and gives a result of 2 which is a normal formula.
If I then go back to cell A1 and enter the formula =A2+3, this will create a circular formula as A2 is based on A1 and I am writing the formula in A1 so essentially the formula is referring to itself.
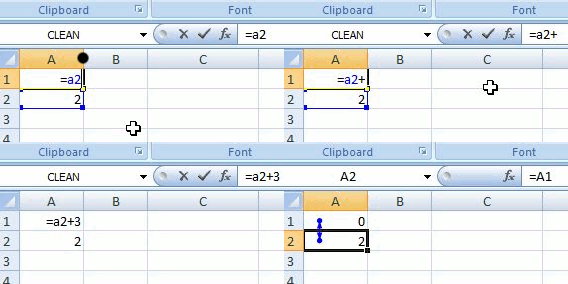
You can see above that the circular reference is indicated by Excel with blue vertical line after selecting OK to it’s warning. Ok so let’s take this one step further.
There is a setting in Excel called ‘iterations’, which tells it how many times to recalculate a formula. Without this function, Excel would go into an infinite loop and eventually stall. By default this is turned off in Excel which is when when you type a circular reference , Excel throws you a warning and doesn’t calculate the formula as it could run infinitely.
Turning On The Iterations Function
1. Office button
2. Excel Options
3. Formulas
4. Iteration
5. Change the default iteration to 1, so it recalculates one time before it stops.
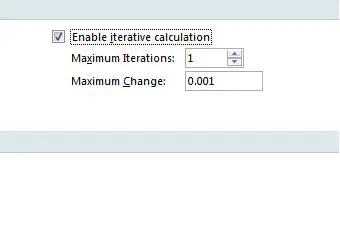
In our case this will result in cell reference A1= 5. So, at the start of this post we were to insert time stamps into Excel. We can exploit this circular referencing and iteration to our full advantage based on the theory above to insert our required timestamps.
Let’s go ahead and do that. In a scenario that we want the Excel timestamp to be in Column A when we are entering data into Column B
1. Type the following formula into A1
=IF(B1<>””,IF(A1=””,NOW(),A1),””)

2. Type something into Column B
3. Your date and time will be stamped.
4. Drag the formula in Column A down to allow time stamping all down your column.
Isn’t that just the bees knees?
What Is The Excel Formula Doing?
The formula is checking cell B1, and if it is not empty it runs the circular formula =IF(A1=””,NOW(),A1) which returns the NOW() function if A1 does not already have a value- thus stamping the time.
Go ahead and give this a go, let me know if you have any other way of creating a time stamp in Excel?
Create A Time Stamp Using VBA
The formula solution, whilst very useful does not suit everyone and has some restrictions in itself. If you are brave enough to take on a small bit of VBA code, we can create and event handler macro which is a good alternative solution to using the formula method which I find is slightly more robust and flexible.
This was a an alternative solution for a subscriber rather than the formula date and time stamp method. He wanted the time stamp to update if he decided to overwrite the contents of the target cells again and again. This I believe gives that solution.
There is no need to insert a module in, or use a module in this piece of code, it is written directly to the worksheet you want the time stamp to appear on.
Step by guide to inserting a timestamp into Excel with VBA.
So, we are assuming that the date time stamp will be entered into Column B when an entry is made into Column A.
- Open up your Excel worksheet and hit F11 to open the Visual Basic Editor. ( if you need to enable the Developer Tab you can find out more here)
- Double Click on the worksheet where your time stamp is to appear- in this example it is Sheet 1.
- In the left hand drop down box select Worksheet and in the right drop down box select Change. (This will create a macro that runs when the worksheet changes), and the Value Target As Range means any cell we choose to apply this to.

- We want to then type the following code underneath the First Line that Excel generated for us.
It should look like this-
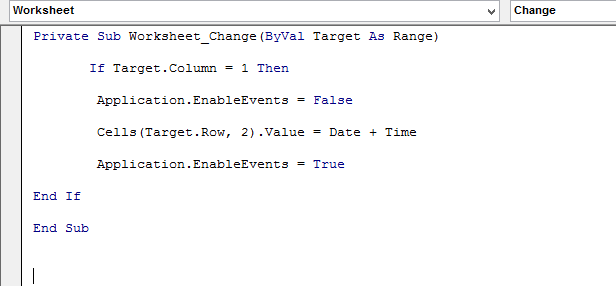
Let’s talk through the code. It is an If Then Statement with the following meaning.
If The Target Column 1 changes, then we want the cells in the Target Row in the Second Column to change to the value of Date and Time. Easy huh?.There a number of extra lines of code in there as you can see, the Application.EnableEvents.
By adding these lines to the code ensures that the macro does not run on and on. This works by turning off the macro then turning it on as required.
This solution allow overwriting of previous entries, and will update with the latest date time stamp. So, if you find the Formula way of inserting a time stamp into an Excel worksheet then these few little lines of code may just be your solution.
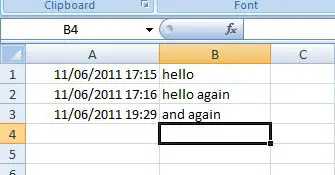
Finally,, the result of this piece of code looks like this.
So there you go, tow methods to create a time stamp in your Excel workbook. Most users have emailed me looking for this type of solution. They are using excel as a sign in sheet for a class or conference. What other reasons have you used the time stamp for? Share in the comments below.

