Hello Excellers. If you’re an Excel user, you know that one of the most tedious tasks is deleting rows if a cell is blank. Well, worry no more! With a simple macro, you can delete any number of rows automatically, based on whether or not a specific cell is blank. In this post, we’ll show you how to write the macro and put it to use. So read on to learn how to make your Excel life a little bit easier!
I use this Excel Macro on a regular basis. I receive a really large data dump every week, and I have to filter out blank records based on Column B. If the cell in column B is empty then the entire rows is deleted. So, a few lines of Excel VBA code has me sorted.
What Does The Macro Do?
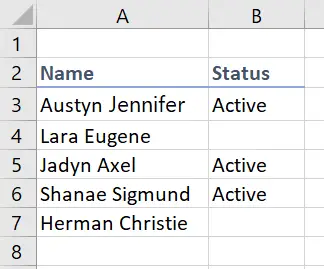
The Macro deletes an entire row if the corresponding cell is Column B is blank. For example, if the cell B4 is blank then the whole row (or record is deleted).
How Does It Work?
The Range.SpecialCells method is used for this macro. This method returns a range object that represents all cells that match the value and and specified. In this case we are looking to return a range object which returns all blank cells in Column B.
Let’s get coding!. Delete Blank Rows In Excel.

Step 1. Starting The Macro.
First, open Visual Basic, hit ALT +F11 or Developer Tab | Visual Basic | Insert Menu | Module. There are now two options to save the Macro.
- Store it in the current Excel workbook you are working on creating.
- Save the Macro in your Personal Macro workbook.
In this instance I can re use the macro over and over again. So, by storing it in my Personal Macro Workbook it wl be available to use whenever the Excel application is opened. Insert the module and name the macro. In this example I have named the Macro DeleteMyEmptyRows.
Step 2. Turn Off Error Handling
The next step is to turn of error handling in Excel. This enables the Macro to continue running even if it comes across an error in its execution. In a more complex project, this would not be advised as we would want to know detail about errors, but in such a small piece of code, it just allows it to run without error.
Step 3. Identify Blank Cells And Delete The Rows.
Next blank cells are identified in the Active Worksheet Column B. xlBlanks is used to identify the blank cells. The rows containg the blank cells are deleted entirely.
Step 4. Test The Macro!.
Finally it is time to test the Macro.. I told you it was a small piece of VBA code didn’t I?.
Want To Copy The Code To Delete Blank Rows In Excel?
So, do feel free to copy the entire code. Just remember to back up your work before you run any Macro.
Sub DeleteMyEmpyRows()
On Error Resume Next
ActiveSheet.Columns(“B”).SpecialCells(xlBlanks).EntireRow.Delete
End Sub
That’s all there is to it! If you want to delete rows in Excel based on whether or not a cell is blank, just use the macro code we provided and customize it to your needs. Be sure to subscribe to our newsletter so you can stay up-to-date with all of the latest tips, tricks, and tutorials from our team here at Excel How To. Thanks for reading and happy deleting!
If you want more Excel and VBA tips then sign up to my monthly Newsletter where I share THREE Excel Tips every month. Receive my free Ebook, 50 Excel Tips on joining.


How To Excel At Excel – Macro Mondays Blog Posts.
How To Excel At Excel – Macro Mondays Blog Posts.