Welcome back to another blog post in my #ExcelTips #MacroMonday Excel 2021 series. There a few ways to run an Excel macro. Hit the F5 key or the Run button while in the VBA window. But, sometimes a giving the user a warning before the macro is run, or ask if they are sure they want to run it the macro is a good safety net. The Yes No message box is a really good way to do this. The logic is simple. Hit Yes and the code or macro runs. Hit No, the code stops running. You are asking are you sure you want to run this code.?. In addition. other information can be supplied at this stage like advising the user to save the file before continuing.
In the example today I will show the framework of the code, writing the Yes No message box. Finally, a simple example where the user will confirm the way to colour the selected range of cells yellow. Ok, let’s get writing some VBA.
Prepare To Write The Macro.
First, open the Visual Basic Editor. There are two ways to do this.
- Hit ALT +F11 or
- Select the Developer Tab | Code Group | Visual Basic. Both methods have the same result.
So, if you cannot see the Developer Tab you may need to enable it. Check out my very short YouTube video for instructions. I will show you how to enable the developer tab in just a few minutes.
Next, you need to decide where to save your Excel macro. So, you can either save the code in your current workbook or in your Personal Macro Workbook. If you want to reuse the macro over and over again in many workbooks save it in the Personal Macro Workbook. If the code is only to be used in the current workbook, save it there. So, the second option is best in this example. to have the warning in the current workbook makes sense.
Here Is The Code.
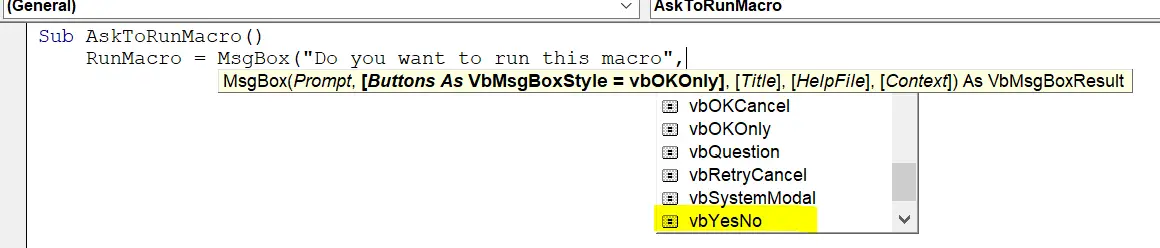
Sub AskToRunMacro()
    RunMacro = MsgBox("Do you want to run this macro?", vbYesNo, "How To Excel At Excel")
        If RunMacro = vbYes Then
'put rest of code here
End If
End Sub
Step 1. Insert A New Module.
The first step is to insert a new module into the workbook. Just hit the Insert Menu | Module.
So, once the new module is inserted, type Sub then the name of the Excel macro. In this example, I have named my Macro AskToRunMacro(). Excel automatically inserts the End Sub ending code once we create a new macro. Any other lines of code are placed in between these two.
Step 2. The Message Box.
The message box appears at the very start of the macro. Now, this makes sense as we do not want to run ANY code unless the confirms they want to do so. The message box syntax of easy to follow.
The message box appears at the very start of the macro. Now, this makes sense as we do not want to run ANY code unless the confirms they want to do so. The message box syntax of easy to follow.
The message box appears at the very start of the macro. Now, this makes sense as we do not want to run ANY code unless the user confirms they want to do so. The message box syntax of easy to follow. A message is displayed in a dialogue box that waits for the user to click a button. Subsequently, an Integer is returned. This indicates which button the user clicked. Yes or No.
MsgBox Syntax
Syntax = MsgBox (prompt, [ buttons, ] [ title, ] [ helpfile, context ])
The MsgBox function has the following named arguments.
| prompt | This is required. String expression displayed as the message in the dialogue box. The maximum length of the prompt is approximately 1024 characters, depending on the width of the characters used. If prompt consists of more than one line, you can separate the lines by using a carriage return character (Chr(13)), a linefeed character (Chr(10)), or carriage return – linefeed character combination (Chr(13) & Chr(10)) between each line. |
| buttons | Optional. Numeric expression is the sum of values specifying the number and type of buttons to display, the icon style to use, the identity of the default button, and the modality of the message box. If omitted, the default value for buttons is 0. |
| title | Optional. String expression displayed in the title bar of the dialog box. If you omit title, the application name is placed in the title bar. |
| helpfile | Optional. String expression that identifies the Help file to use to provide context-sensitive Help for the dialogue box. If a helpfile is provided, context must also be provided. |
| context | Optional. Numeric expression that is the Help context number assigned to the appropriate Help topic by the Help author. If context is provided, helpfile must also be provided. |
So, not all of the arguments are required in this function. In my example, I need only the prompt question of do you want to run this macro?. In addition the second argument of buttons. Selection is vbYesNO.
Step 4. The IF Statement.
The next part of the code is the IF Statement. It gives the user a choice. So, if the user selects Yes, then the code runs. If No then the code does not run, therefore any code to run comes in between IF and End If.
If RunMacro = vbYes Then
'put rest of code here
End If
In this framework example, there is no extra code to run, just the message box.
Step 4. Ending The Macro.
Finally, the code ends when all the If statement has completed. This line of code already is in the module as part of the naming of the macro.
End Sub
Work An Example With The Message Box Framework.
Now the framework of the message box has been completed I will work through an example. The macro used will fill all of the cells in a range that the user has selected to the yellow. So, as we already have the walkthrough of the Msgebox function let’s concentrate on how the code in between works.
Here Is the Code.
Sub AskToRunMacroColor()
RunMacro = MsgBox("Do you want to run this macro", vbYesNo, "How To Excel At Excel")
If RunMacro = vbYes Then
Dim rng As Range
Set rng = Selection
rng.Cells.Interior.Color = vbGreen
End If
End Sub
Step 1. Declaring Variable or Variables.
The code the user wants to run is located right after the user confirms Yes to run the code. A variable of rng as Range is used to store the range of cells the user selects. This creates a memory container in Excel to store this information.
Dim rng As Range
Set rng = Selection
Next, the second line of this part of code then sets the range as the range of cells the user has selected.
Step 3. Color The Range Of Cells.
The next line of code is simple. VBA has a range of constantly named colors.
vbBlack, vbRed, vbGreen, vbBlue, vbYellow, vbMagenta, vbCyan, vbWhite
So, I have chosen vbYellow. Simple.
rng.Cells.Interior.Color = vbYellow
Step 4. Ending The If Statement.
Finally, the If statement ends once the user-selected range of cell are all filled yellow. This is the end of the code that ran due to the user confirm they wanted to run the macro by selecting Yes in the message box.
End If
Step 5. Ending The Macro.
Finally, as in the framework example above the code ends when all the If statement has completed. This line of code already is in the module as part of the naming of the macro.
If you want full details on the MsgBox function click the link is here.