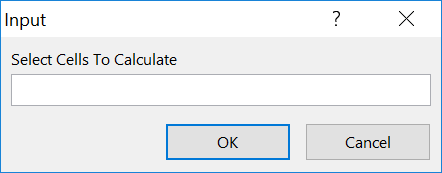
Hello Excellers, its Monday again and that means time for some more #macromondayfun. Today I want to share with you a useful macro which allows the user to calculate only selected cells in an Excel worksheet. You may have a large worksheet which has tonnes of formulas and you only want to update a few. I use this macro on a particularly fora heavy worksheet at the moment. I nave the calculation property of the worksheet set to Manual calculations. This macro allows the user to select a cell range and Excel will only update the calculations on those selected cells. How cool is that?. Let’s crack on and get writing our simple macro.
What Does The Macro Do?
This macro will prompt the user to specify a range of cells that they want to refresh calculations in using an Input Box. These are the only cells that Excel will calculate.
How Does The Macro Work?
The macro uses the Application.InputBox which displays a dialog box for user input. Returns the information entered in the dialog box. This range is used to determine which cells to calculate in the worksheet.
Step 1. First, we need to create a new module to save this Macro into. Insert a module by opening Visual Basic by hitting ALT+F11, or select the Developer Tab and in the Code Group Select Visual Basic. You can now hit Insert Module. I have chosen to store this in my Personal Macro Workbook so I can use with any workbook I want to.
If you want to read more about the Personal Macro Workbook then you can read my blog posts below
Macro Mondays -Creating and Updating Your Personal Macro Workbook
Macro Mondays – Create A Shortcut To Your Personal Excel Macro Workbook
Step 2. We need to declare a variable. Dim Rnge As Range. This just allocates an area in Excel’s memory to store this range of cells we are collecting form the user.
Step 3. We instruct Excel to display an InputBox to the user and prompt them to select a range of cells to calculate.
Using The Input Box in Excel Macros.
The syntax of the Input Box is straightforward.
expression. InputBox (Prompt, Title, Default, Left, Top, HelpFile, HelpContextID, Type)
expression A variable that represents an Application object.
An explanation of the Parameter types can be seen below.
In this example today we are specifying only a PROMPT which is “Select The Cells To Calculate” and also jumping right to Type which we specify as type 8 which is a cells reference as a Range Object. Exactly what we want. A full list of the Types can be seen in the summary table below.
The dialog box has an OK button and a Cancel button. If you select the OK button, InputBox returns the value entered in the dialog box. If you select the Cancel button, InputBox returns False.
Step 4. The next step instructs Excel to Calculate the range of cells selected by the user and stored in the memory container we specified by declaring our variable.
Step 5. The macro ends after the cells have been calculated.
Step 6. My favourite step. Test your Macro!


