Hello Excellers, welcome back to another #MacroMonday in my Excel series. In this post, we’ll show you how to convert merged cells to centre across selection. This is a helpful option for those who want more control over both their data and aesthetics. This tutorial will show you how to write a simple Excel VBA macro that converts merged cells to centre across selection in your Excel worksheet.
Using Merged Cells.
Many Excel users like to merge cells on their worksheets, whereas some never use them at all. I rarely use merged cells myself. Sometimes for an odd Excel template, they can be helpful aesthetically to improve the look and feel and contribute to the flow of the Excel solution. However, when it comes to functionality or developing serious spreadsheets, I do not use them. There are a few reasons I choose not to use them, which I will explain below.
Reasons Not To Use Merged Cells.
I have three main reasons I avoid using merged cells. These reasons have not changed for the years I have worked with Excel.
The risk I find with merging cells are
- Unable to sort data.
- You lose the ability to copy and paste.
- Running VBA programming code does not handle the merged cells well at all. Usually, more code is needed to deal with the merged cells. So, I like to avoid them.
So, here is a solution that looks like merged cells with all the usual functionality and avoids my three issues above?. Great!.
Centre Across Selection. The Alternative To Merged Cells.
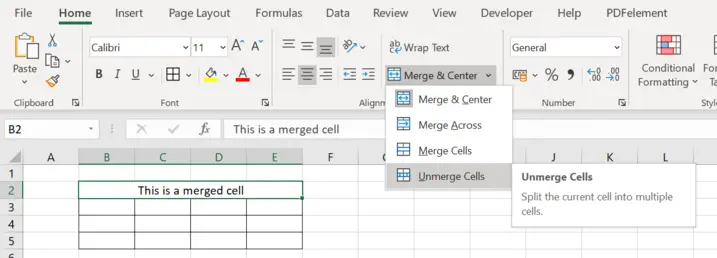
Anytime you need to think that merged cells might be a good idea, the alternative will be better. Yes, there is an excellent alternative to merged cells, having all the benefits but none of the drawbacks. Yes!. Follow the steps below to use CENTRE ACROSS SELECTION. Normally a merged cell looks like the screen shot below. The cells B2 to E2 are merged.
So, to get the same effect all we need to do is firstly UNMERGE the cells.
- Select the cells.
- Home Tab | Alignment Group.
- Unmerge cells.
You now have normal cell formatting.
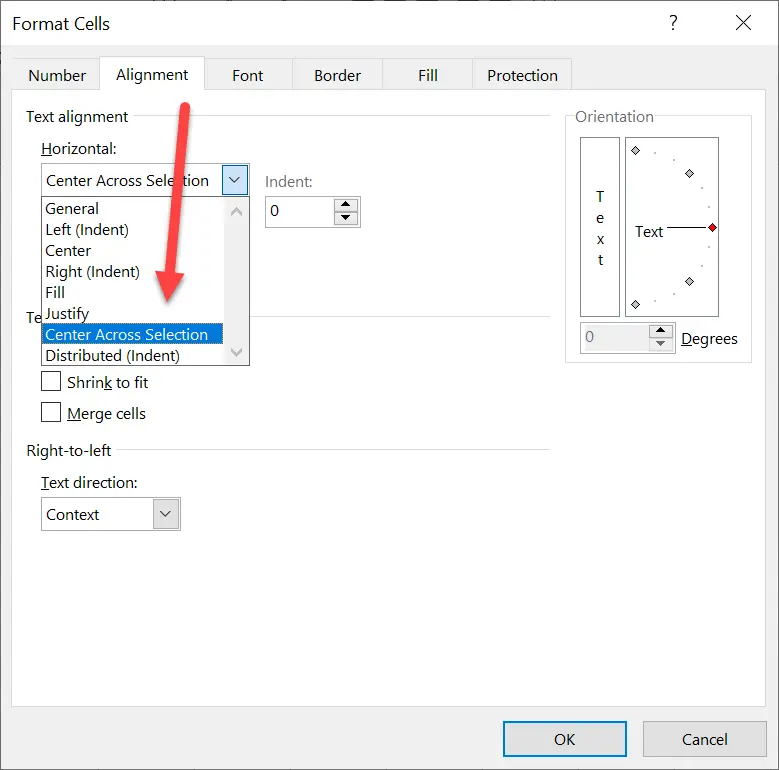
- Select the cells that you want to appear ‘merged’. I will select B2 to E2 again.
- Home Tab | Alignment Group | Expand Alignment Settings.
- Select the Alignment Tab | Text Alignment.
- Horizontal | Center Across Selection.
- Finally, hit ok.
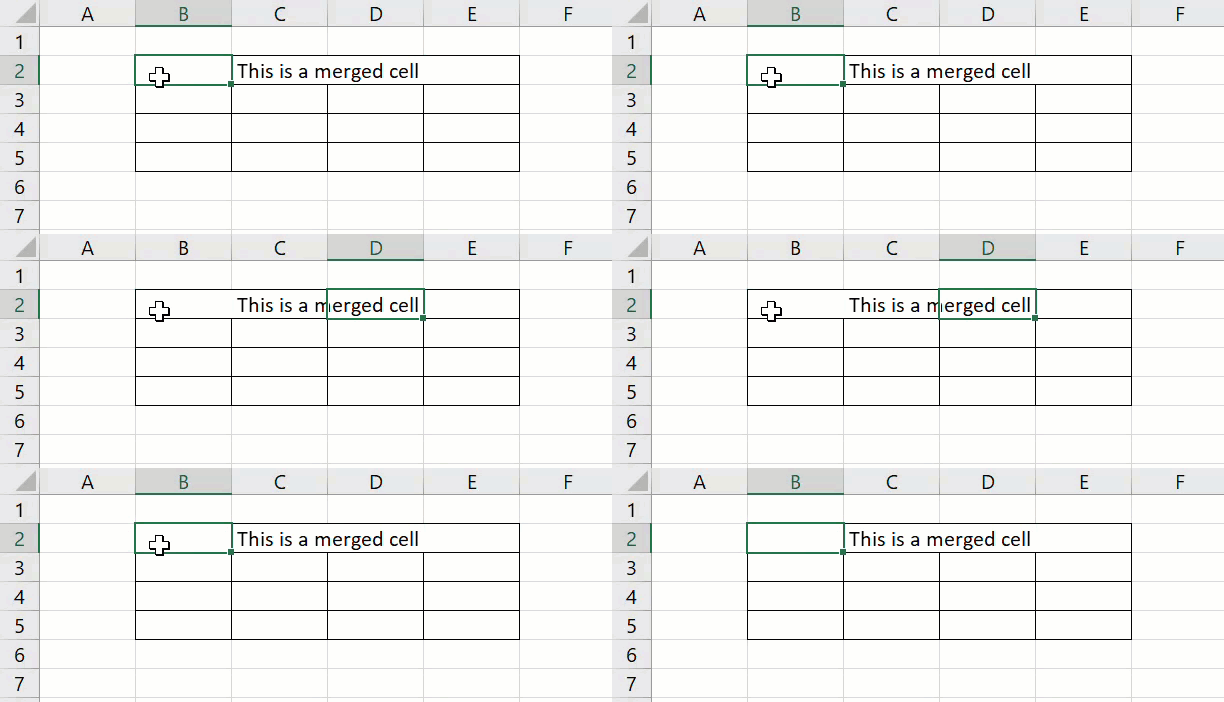
Now, see that the text ‘appears’ to be centred. You can still click into the individual cells, however. This means we retain all of the worksheet functionality. Result!. Job is done.
So, if you already have merged cells in your Excel workbook, I promised at the start of this tutorial to show you how to convert them to Centre Across Selection. So, let’s do it with a simple Excel VBA macro. For single row merged cells in Excel, this Macro works well. An example of how I use this is for unmerging Excel headers and titles.
Starting The Macro.
When you decide to write an Excel macro, you have two places to save it.
- Store it in the current Excel workbook you are working on creating.
- Save the Macro in your Personal Macro workbook.
So, what is the difference? It is simple. If the code you are writing is specific to that workbook, then store it within the workbook. If you can reuse a type of Macro, keep it in your Personal Macro Workbook. In this example, I could reuse this Macro repeatedly to convert merged cells to centre across selection. I, therefore, save it in my Personal Macro workbook.
If you want to read more about your Excel PMW then check out my blog posts below.
Macro Mondays -Creating and Updating Your Personal Macro Workbook
Macro Mondays – Create A Shortcut To Your Personal Excel Macro Workbook
Why Is My Personal Macro Workbook Not Loading Automatically?
So, back to fining those merged cells in Excel and converting them to centre across selection.
First, open the Visual Basic Editor. There are two ways to do this.
- Either by hitting ALT +F11 or
- Selecting the Developer Tab | Code Group | Visual Basic. Both methods have the same result.
Here is the full code for the Macro.
Option Explicit
'Step 1. Name your macro
Sub ConvertMergedCellsToCenterAcrossSelection()

'Macro by HowToExcelAtexcel

'Step 2. Declare Variables
Dim rng As Range
Dim mergedrng As Range


'Step 3.Loop through all cells in Used range
For Each rng In ActiveSheet.UsedRange


'Step 4.If the range contains merged cells and single row
       If rng.MergeCells = True And rng.MergeArea.Rows.Count = 1 Then


'Step 5. Set variable for merged range
       Set mergedrng = rng.MergeArea


'Step 6. Unmerge the cells and apply Centre Across Selection
        mergedrng.UnMerge
        mergedrng.HorizontalAlignment = xlCenterAcrossSelection

    End If

Next
'Step 7.End the macro
End Sub
Step 1. Name the Macro.
The first step after inserting a new module is to name the Macro. Type Sub then the macro name. There are a few guidelines on macro names. If you need to review these guidelines, read my blog post here. In this example, I have named the macro ConvertMergedToCentreAcrossSelection. Now, this may seem like a long name for a macro. But, I know exactly what this macro does when I need it again. Note that Excel automatically inserts the End Sub part of the code once I name the macro.
Sub ConvertMergedCellsToCenterAcrossSelection()
End Sub
Step 2. Declare Variables.
The next step in writing this Excel Function is to declare any variables. Declaring variables creates a type of memory container in Excel to store these values. In this macro, I have created two variables. The range of cells in the use range of the worksheet as well as the range of merged cells.
Dim rng As Range
Dim mergedrng As Range
Step 3. Loop Through All Cells In The Used Range Of Cells.
This line of code begins the looping for all cells in the used range. I am using the For Each Loop. The syntax of this looping is
For Each object-name In Range
For Each rng In ActiveSheet.UsedRange
As you can see in the line of code Excel will loop all of the cells in the active worksheets used range of cells. The ojbect is the declared variable rng.
Step 4. Using The IF Then Statement To Choose Merged Cells
Next, this line of code makes use of the IF Then statement . The VBA IF statement is used to allow your code to make choices when it is running. In this example to test if the cells in the range in fact contain merged cells and that that the range is a single row.
If rng.MergeCells = True And rng.MergeArea.Rows.Count = 1 Then
Step 5. Setting The Variable For the Merged Range.
If the If Then statement is true then the variable is set for the merged range.
Set mergedrng = rng.MergeArea
Step 6. Unmerge the cells and apply Centre Across Selection
Step 6 is where the cells are unmerged and the Centre Across Selection is applied. The looping continues until all of the merged cells in the active range are convered to centre across selection.
mergedrng.UnMerge
        mergedrng.HorizontalAlignment = xlCenterAcrossSelection

    End If

Next
Step 7. The Macro Ends.
Once all of the merged cells in the active worksheet used range are converted to centre across selection then the code ends. Excel already has this line of code from the beginning of the macro.
So, finally that is it. The only part left is to test the Excel Macro. Does it work?. Let me know in the comments below if you use this code to unmerged your cells in Excel.
Merged cells can be a big problem if you’re not careful. They make it hard to read and do math, they can cause problems with formatting or alignment in your spreadsheet, and more. But don’t worry! We have the solution for you – Convert merged cells to Centre Across Selection!. I hope you found this article helpful.


