Welcome back Excellers to another blog post in my #macromonday 2019 series. Today we will create an easy Excel VBA macro to highlight negative numbers easily with conditional formatting. This will take just a few lines of code.
Conditional Formatting Negative Values
Do you need to quickly highlight negative numbers in your Excel data set?. Is your go-to method usually to default to Home Tab | Styles Group | Conditional Formatting?. Then why not try a quicker method using some code and a keyboard shortcut?. So then why not?.
Preparing To Write The Macro
First, you will need to open the Visual Basic Editor. There are two ways to do this. Either by hitting ALT +F11 or selecting the Developer Tab | Code Group | Visual Basic. Both methods have the same result. You then have a choice, you can either create a module to store your code either /#’];//in your Personal Macro Workbook or in your current workbook. What’s the difference?. Well, if you save the macro in your Personal Macro workbook it will be available in any Excel workbooks. If you store it in the current workbook then use is restricted to that workbook.
Learn More About Your Personal Macro Workbook (PMW)
If you want to read more about your Excel PMW then check out my blog posts below.
Macro Mondays -Creating and Updating Your Personal Macro Workbook
Why Is My Personal Macro Workbook Not Loading Automatically?
Macro Mondays – Create A Shortcut To Your Personal Excel Macro Workbook
I want to store this macro in my Personal Macro workbook.
Starting The Macro

We need to start off the macro by inserting a New Module. Do this by selecting the Personal.xlsbworkbook, then Insert Module. Type Sub then the name of your macro. In this example, I have called it SuSub HighlightNegativeNumbers. Notice that Excel will automatically enter the end text End Sub to end the Sub Routine. We simply need to enter the rest of the code between these two lines.
[stextbox id=’info’]
Sub HighlightNegativeNumbers()
End Sub
[/stextbox]
Declaring A Variable
We need to declare a variable. This ensures that Excel creates a memory container for this value. In this example, we need to declare the following. This ensures the user selected range is stored in the Excel memory.
[stextbox id=’info’]
Dim Rng As Range
[/stextbox]
Looping Through Selected Range
So, this part of the code uses the For Each Loop method. Excel will loop through all of the cells in the selected range. Excel uses the WorksheetFunction.IsNumber method at this point. It checks the type of value and returns TRUE or FALSE depending if the value refers to a number.
[stextbox id=’info’]
For Each Rng In Selection
If WorksheetFunction.IsNumber(Rng) Then
[/stextbox]
Conditionally Format Negative Values
Next, if Excel finds values in the range it is looping through to be negative (<0) then its font color is changed to RED in this example. Excel loops through all of the cells in the selected range.
[stextbox id=’info’]
If WorksheetFunction.IsNumber(Rng) Then
If Rng.Value < 0 Then
Rng.Font.Color = -16776961
End If
End If
Next
[/stextbox]
Ending The Macro
Finally, once all of the selected range has been checked for negative values the code finally ends. This instruction was already entered into the module for us when started the type the name of the macro.
[stextbox id=’info’]
End Sub
[/stextbox]

Assigning A Shortcut Key To The Macro
Once we have our macro written and tested, we can assign a keyboard shortcut key to it.
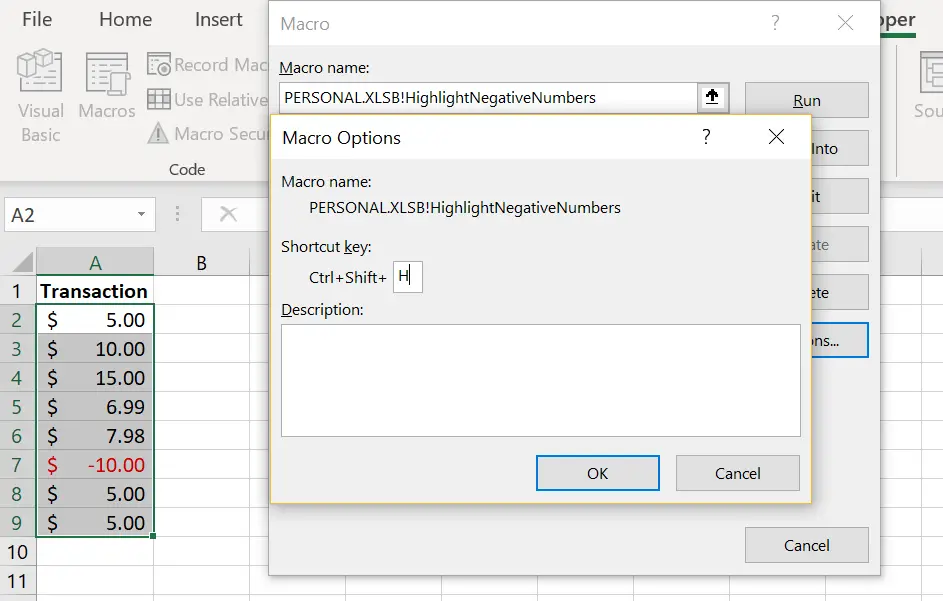
We can use the Macro Options window in Excel to create a shortcut key to call the macro. Here are the instructions on how to set it up. In the Developer tab and click on the Macros button. Alternatively, you can use the keyboard shortcut Alt+F8.
After selecting the macro that you want to assign the shortcut to, click the Options button. In the Macro Options Window, you can create the shortcut you want by adding a letter, number, or symbol.

If you want more Excel and VBA tips then sign up to my monthly Newsletter where I share 3 Excel Tips on the first Wednesday of the month and receive my free Ebook, 30 Excel Tips.
Likewise, if you want to see all of the blog posts in the Macro Mondays Series Click The Link Below
How To Excel At Excel – Macro Mondays Blog Posts.
So, Don’t forget to SUBSCRIBE to the How To Excel At Excel Newsletter for more tips the first Wednesday of the month.


