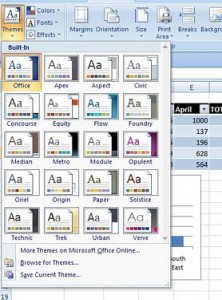
Using a document theme is a great way to personalise and standardise your own personal or company image for consistency and a professional look. It is really not complicated to do, and can save you valuable time whilst maintaining your image or brand. A few mouse clicks is all it takes to change the look of your workbook.
The elements that are controlled in Excel by theme are
- Cells and ranges that use any theme colours (not standard colours)
- Charts
- Tables
- Pivot tables
- SmartArt
- Shapes
- WordArt
- Sheet Tab Colours
You can see the difference in the effect of changing an Excel Theme in the figure below.
The first picture shows a standard Sales Report with the default Excel Office theme which has been applied to Heading 1, a graph and a data range.

The same Sales Report with an applied theme can be seen in the figure 2.

How Do I Apply A Theme In Excel 2007
Its really easy to apply a theme, and the choices that you have are vast, to see what is available just select
1. Page
2. Layout
3. Themes
If you give this a go, you will see this is a ‘live preview’ of the theme, as you move the mouse over the theme it changes live on the active sheet the different themes.

When you see a theme you like simply click it to apply that theme to all of the worksheets in your workbook. So remember you cannot have different themes on different worksheets, they apply to the whole workbook.
Once you have chosen your theme, you will find that the choices of the gallery will reflect the new theme, for example,the chart styles that are available for you to choose will change.
The fonts and font sizes change with the varying themes, therefore the layout of your worksheet will change, so a worksheet that fitted on one page for printing, may not do so after you change the theme. Some adjustments may be needed on your worksheet after you have applied your new theme.
The Page Layout- Themes group contains three other controls- Colours, Fonts and Effects. These three controls can be actually used to ‘fine tune’ your theme for example if you have a found a theme you really like but are not taken with the Font used you can specify another font but selecting
1. Page Layout
2. Themes
3. Font
4. Create new Theme Font
Each theme uses two fonts, one for the Header Section and one for the Body Text. In some themes they are the same but in other they do differ.
Once you have selected the create new theme font give it a name and select save.
You can repeat the above to change the theme colours just select Colours instead of Fonts. If you want to go even further you can create a customer set of colours by choosing
1. Page Layout
2. Themes
3. Colours
4. Create Theme Colours
By selecting the above it will display the dialog box as below
Each theme has 12 colours, four of them are for text and backgrounds, six for accents and tow for hyperlinks. The theme effects on SmartArt, Shapes and Charts are operated by the theme and cannot be customised any further.
To save your newly created masterpiece of a theme!
1. Page Layout
2. Themes
3. Save Current Theme.
Your customised themes will appear in the theme list in Custom Category, and other Office 200u7 Applications such as Word and Powerpoint will be able to use these theme files.